December 19, 2013

A Merry Little Christmas

Today's card started out with remnants from my Christmas card class.  The DSP is from the Winter Frost Paper Stack.  Initially I had reservations about the prints in this pack but once I started working with them I found they were quite pretty.  I stamped the tree from the Special Season stamp set with the silver Encore Pad.  The silver ink doesn't seem to dry so I embossed the image with clear embossing powder.  This is another simple layout.


Thanks for stopping by!

December 18, 2013

Only One Week 'Til Christmas!

Every year Christmas seems to sneak up on me.  Just how does that happen?  This year I decided that I wouldn't stress myself out by doing too much.  So, I haven't really done any shopping or put much effort into decorating.  Today my son, Michael, is going to help me get our tree out of the attic and hopefully help me set it up.  It would probably be too much to ask to get some assistance with decorating it too. 

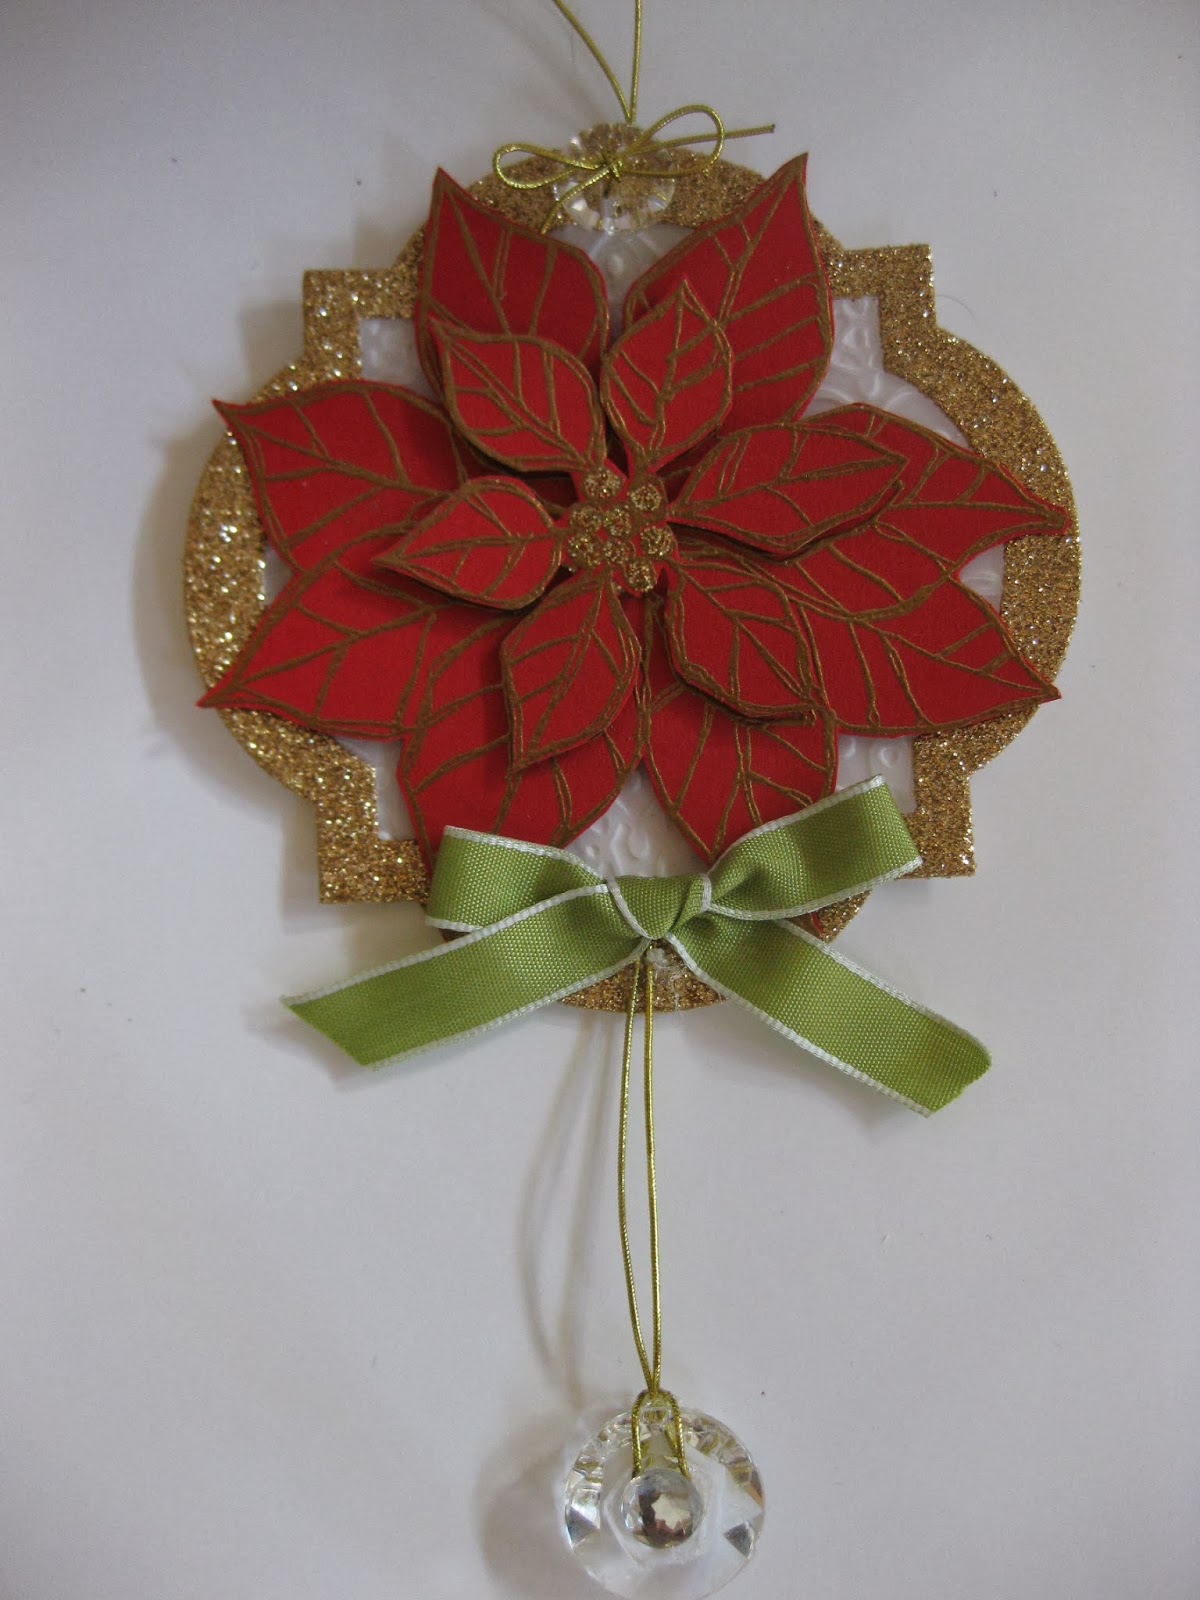
I have been pretty busy stamping and crafting though.  On Monday night my local stamping group, the Cyberstampers, had a Christmas party.  We had a shoebox swap, an ornament swap and a gift exchange. It was a lot of fun.  I enjoyed the shoebox swap.  There were some great projects.  I worked like crazy to get 12 ornaments done and only came home with 7 swaps (it was optional). That leaves me with a few extras that I can use as Christmas gifts.


Next up is my Shoebox Swap.  Back in October I put together a set of cute clothes pins with a Christmas theme and took them as show & tell for our monthly business meeting.  Everyone seemed to like them so I decided to put together a non-Christmas set for the swap.  Recently I added the Polka Dot Pieces stamp set to my collection which gave me the inspiration I needed. 
 
 
This set goes great with the Garden Gingham DSP. A special thank you to Linda for letting me borrow her bird punch.
 
Thanks for stopping by--be sure to come back tomorrow!

November 20, 2013

Stampin' Up Holiday Sale

http://www.stampinup.com/ECWeb/ItemList.aspx?categoryID=1680


Today is the day!  Get your shopping skills sharpened because Stampin' Up!'s Holiday Sale begins today!!  The sale will run from November 20th through December 2nd and will feature dozens of products at 20% to 50% off.  You can click on the link here to view the Stampin' Up Holiday Sale flyer. And for TODAY ONLY, you can get 30% off the whole set of Many Marvelous Markers, Stampin' Trimmer, and Simply Scored Diagonal Plate.  Unbelievable!  If you don't have a Stampin' Trimmer, I urge you to quickly grab one of these because I think it is the best trimmer I've ever had.

You can click on the link here to view the Stampin’ Up! Holiday Sale flyer!  At the same time, Stampin’ Up! is still running their Weekly Deals so be sure to check those--just click on the picture to see all the details.


http://www.stampinup.com/ECWeb/ItemList.aspx?categoryid=1634


This is also the last day to sign up for my Christmas Card class.  Call me today for the details!  Space is limited.

October 28, 2013

Last Chance--25% off 25 Sets

Hurry, hurry, hurry--today is your last chance to take advantage of the latest SU anniversary special.  There are some great sets at 25% off.  Shop at my Stampin' Up Store before the sale ends!  Place an order and get a chance to be the Mystery Hostess by using the Hostess Code 2HCSJUJIf you're not sure how to place an order online, you can always email or call me with your order. 


Download a Print Flyer that lists all 25 sets at 25% Off.
 
 
Thanks for stopping by!


October 25, 2013

Faux Washi Tape Technique

Are you looking for a new technique that is quick and easy?  This faux washi tape technique may be the one for you.  All you need is blue painter's tape and your ink pads.  Tear off a length of tape from the roll, lay on top of your ink pad with the sticky side down, then run your finger along the length of tape to ink it up.  Lift tape off ink pad and position tape on your base cardstock.  Once again, run your finger over the tape to transfer the ink. Remove tape, and voila!--you have faux washi tape.  


Thanks for stopping by!

October 24, 2013

Merry Little Christmas Tag Card

Have you started working on your Christmas cards yet?  I've been dabbling for a few weeks already.  Currently I'm working on treats and whatnot for a craft Fair.  I have a little "buyers remorse" after paying my fee for a table.  It's a matter of whether the effort required to prepare for the craft fair will actually pay-off  or will I end up going home with my creations?  I'd love to hear what you think would be a hot seller at a craft fair.

This weekend I made a handful of the following cards for my monthly group swap.  I love this Merry Little Christmas stamp set.  I used the tag from the Chalk Talk framelit set. The base card is Crumb Cake cardstock stamped with a snowflake from the Snowy Day set.  Don't forget you can also purchase a Simply Sent kit to go with the Merry Little Christmas.  The kit is great because the cards can be assembled quickly.


Thanks for stopping by!

October 07, 2013

Still Here!

Came back from our short vacation and had a spurt of creativity.  I've been seeing so many Christmas cards online that I got the bug to make a few of my own.  If you haven't had a chance to see the new Christmas single stamps that Stampin' Up has to offer you need to check them out.  They are great!  This is a very simple layout and you will probably notice that I used another brand of printed cardstock. 


I'll leave you with a bit of the scenery I enjoyed while I was on vacation.  These photos were taken along the Amalfi Coast in Italy.


Thanks for stopping by!
 

September 04, 2013

Truly Grateful


This past weekend I spent a fair amount of time card making.  I haven't been as successful as I'd like staying off my broken foot.  I don't think I'd ever make a good invalid--I like to keep busy.  Thought I'd get in a last minute card for the Create with Connie & Mary Color Challenge.

CCMC266
 
I won this stamp set during Prize Patrol at convention and haven't really taken time to play with it.  The colors of the challenge lend themselves to a Fall theme.  Here in San Antonio, we don't get the autumn season until November.  Although it is September we are still enduring temperatures in the high 90's. 
 
Here are a few other cards I made over the weekend using the same layout and framelit set. 


Thanks for stopping by!


August 28, 2013

Halloween Bash Gift Card/Treat Holder

This treat may be a little too involved to make for all your Trick-or-Treaters but it may be just the thing for a special someone.  There was a great video tutorial on YouTube demonstrated by Josee Smuck for a Christmas and a Birthday version.  If you don't do Halloween you could make them in a harvest type theme.  I plan to make several more and put small Hershey's bars in them.  The base of this is an envelope folded in half.


Here is the inside:


The fun skeleton face is from the Halloween Hello set.  Stay tuned tomorrow for another cute project using the same stamp set.  Thanks for stopping by!

August 26, 2013

Paper Pumpkin Delivery

This week I found a special delivery in my mailbox--my very first Paper Pumpkin Kit.  I really didn't want to make the card example from the kit so I did a little surfing and found some great ideas.  Thank you to all the demonstrators who put together such fun cards for me to CASE. One of my cards is based on a swap card layout from the talented Alicia Craig, a Cyberstamper team member. 


There is less than one week left to take advantage of the Paper Pumpkin Promotion.  Here are all the details. 
 

Offer Dates: July 18, 2013 -August 31, 2013
Offer Details: Use the promotion code PUMPKINDEAL to join Paper Pumpkin before August 31, 2013, and pay only $10 a month* for the first two months.
*plus tax, where applicable. Shipping included!
The Fine Print:
  • For new subscribers only.
  • Promotion applies only to the first two months of a new subscription. After receiving two month's worth, the price for each month's kit will go to the regular price: $19.95.
  • You need to visit mypaperpumpkin.com to join.
  • You must click "Add Promo Code" and then enter the promo code PUMPKINDEAL in the "Promo Code" field when you sign up on the mypaperpumpkin.com website to take advantage of this promotion.
  • You must join by Saturday, August 31, 2013; 11:50 PM (MT).
 
If you decide to sign up for Paper Pumpkin, don't forget to select me as your demonstrator.   Thanks for stopping by!


August 25, 2013

Chalk Talk

 
Here is the card and layout I CASEd when I put together my Paper Pumpkin Kit.  Special thanks to Alicia for her great layout.  She is a very talented stamper. I love getting her swaps at our meetings.
 
 
I thought I'd make a card for my son this week to send off to him in the dorms. (Last weekend we helped him move in at Texas Tech). Here are the two I put together with scraps from the Soho Subway DSP. The buttons are made with the clay and colored with markers. I don't know if he will appreciate a card from his mom or not.  He may not be missing me much yet!  It's been quiet here at home without him.
 

August 23, 2013

Birthdays and Broken Metatarsals

Say what?!  Last Friday I found out exactly what a metatarsal was when I accidently rolled my foot off the edge of the garage floor.  When I heard the crunching noise I knew it wasn't a good thing.  I took myself off to the emergency clinic for a few x-rays and found out that I had fractured the 5th metatarsal bone in my foot.  The doctor promptly supplied me with some fashionable footwear until I could get to a podiatrist.  I knew I grew up in the 80's for a reason--I'm sporting a moon boot!  On Tuesday my new podiatrist told me that I will be wearing it for the next three months and I need to stay off my foot so that it can heal.  At least it was a clean break and won't require surgery. So now I have a legitimate excuse to sit and make cards.

On to the birthday part.  Here is the birthday card I made last week.  One was for a special request and another for my mom. Black and yellow always look dramatic together.  I still had some vellum butterflies leftover from my convention swap-making and they just flew onto the card!

 
Thanks for stopping by!

August 20, 2013

Halloween Hello and Herringbone Technique

Last week I ran across a great tutorial for a herringbone technique on Julie's Stamping Spot. I decided to give it a whirl using the Witches' Brew DSP.  On my first attempt I followed the instructions exactly to make a very orderly herringbone pattern.  You can notice how the DSP creates a V-shape.  Then I combined my background piece with a challenge Freshly Made Sketches to create the following card. I used Halloween Hello and Gorgeous Grunge stamp sets. The skeleton face is covered with the new fine black glitter which makes it stand out more.  The poor little bat should have been glittered too.

 
The next card I made the herringbone pattern more random and preferred the result.  This is the swap card I took to the Cyberstampers monthly business meeting.  It took a few hours to make 10 cards  but I have a good reason for sitting around stamping and not doing any housework.  This is a story for another day! 
 
 
Thanks for stopping by!

August 14, 2013

Strawberry Slush Flower Shop

Strawberry Slush is my favorite color for this summer.  The name just sounds so refreshing--makes me want to run out to Sonic to pick-up an actual strawberry slush.  Prior to convention I received a swap in the mail from my upline (top of the heap), Jill Olsen.  She is one of the very first demonstrators to sign under Shelli Gardner twenty-five years ago.   Her card inspired me to make a cute little card with the Flower Shop stamp set. 


For the background I used the In-Color Core-dination cardstock, embossed it with the Alphabet Press embossing folder, then lightly sanded it.  The flower centers are punched from glimmer paper.

Thanks for stopping by!

August 13, 2013

Elements of Style Leftovers

Last week I received an unusual request to make a surprise birthday card.  On Friday evening I decided to get busy and dug out the Modern Medley paper remnants on my crafting table.  I'm sure I've said it before but my crafting area is always stacked sky high.  I end up creating on a six square inch space--without grid paper underneath!  Anyway, I was pleased with the results but I will refrain from posting it until after the 18th.  The card today was made with some extra bits and pieces that were cast-offs from the design process.  The composition is a little too square for my preference. The base card may look like it is white in the photo but it really is Very Vanilla.

 
Thanks for stopping by!

August 05, 2013

Mosaic Christmas and a Dead Computer

On Saturday my laptop computer died.  It wasn't even very old.  I am so sad.  So, my choices for computer use is our old desktop (although it was just upgraded) and my son's Macbook Pro.  Now you have to understand that with my husband and I being engineers and sons who are working toward being engineers, we are a PC family.  Do you recall the commercials on TV with the two men, one says he is a Mac and the other says he is a PC--well, we fit the PC profile perfectly!  When the Mac came into the house it was almost sacrilege.  I asked my son how could he do this to us?  We all had a good laugh.  What do you think I am using?  The Mac!  I'm not sold on it though.  I fit the adage, it's hard to teach an old dog new tricks.  My son wants to sell the laptop to me but it may be too much of investment for my limited computer usage.

Last week I CASEd a couple of cards from Patsy Waggoner.  Today's first card was an exact replica of a shadow box card made with Kind & Cozy.  Too cute!  Then I decided to mix it up a bit and use Mosaic Madness along with Season of Style DSP to make a few Christmas cards.  Yikes!  Not Christmas already.  It must be the weather that drove me to it.  It has been so hot here that I had to make the cards to feel cooler.


Thanks for stopping by!


August 02, 2013

Gorgeous Grunge (CCMC262-Color Challenge)

Today my son was going to a good friend's birthday party and asked if I had a card that he could take.  Of course I didn't have a card that I thought would work for a 17 year old boy so I had to make one.  In my blog surfing I happened upon a card by Patsy Waggoner that inspired me.  I dragged out a couple of retired sets to use but ended up mainly relying on Six-Sided Sampler and Gorgeous Grunge.  You will see a fleur-de-lis from Extreme Elements behind the die cut numbers and the birthday greeting is from my old Grunge Rock set.  Bermuda Bay, Basic Black and Smoky Slate are very striking colors together.


Do you think he will mind the hexagon shaped bling?  I die cut the numbers out of the silver glimmer paper but they just didn't pop out of the card so I tried again with the black.  Wish Stampin' Up had a black glimmer paper.  Wouldn't that be great for Halloween?  

Thanks for stopping by!

August 01, 2013

Simply Sketched (TSSC 274)

This week I found another great sketch at Techno Stamper's blog.  Last night I was stamping and had a pack of the new In-Colors on my messy table and some remnants of a DSP share.  Pistachio Pudding was there staring at me and I was asking myself what I was going to do with all that mint green cardstock!  Now I love, love, love greens but this one just reminds me of babies and butter mints.  As a challenge to myself I decided to use Pistachio Pudding cardstock with the Venetian Romance DSP (another of my not-so-favorite papers).  I must say I am pleased with the results.  The Simply Sketched stamp set has some really pretty images and seemed to coordinate with the softness of this combo.  Do you find yourself struggling to use certain colors?  Which is your least favorite color at the moment?  I challenge you to create a project with it and drop me a note to tell me how it went.


Thanks for stopping by!

July 31, 2013

Friendship? Yes Please -- CCMC261

Today I put together a card for this week's Create with Connie & Mary Challenge.  I have had my work/craft table out in the middle of my living room floor since I came back from convention.  Once it is there I find it very difficult to clean everything up and put it away.  My son made a comment last night about how messy it was. Let me tell you, that is like the pot calling the kettle black.  He has his own hobbies that seem to spread but somehow that is different from what I have going on!  Anyway, here it is.  I had seen a card online that used this color/DSP combo and I thought it was very pretty. 

 
Have a great day!  Thanks for stopping by.

July 29, 2013

How to change to look of a CASEd card

Recently I ran across a cute card created by LeAnne Pugliese, owner of Wee Inklings, and I just had to make one for myself.  While I was at it, I changed it up a bit to get a different look.  When I was done, I decided I like the original best.

Copy of the Original (just a different greeting)


Mod 1

Mod 2
 
The next time you are CASEing a card, try making a minor modification.  Thanks for stopping by!


July 28, 2013

Monday Lunchtime Sketch Challenge (TSSC273)

Here is the sketch from Techno Stamper's Monday Sketch Challenge.  I wanted to use the I Am Me DSP because of the bright colors.  I like the three panels on this sketch.  It's great for showcasing the different DSP patterns.  It was a bit of a struggle to find a stamp set from my collection that seemed to go with the DSP.  I finally settled on Make a Cake, Pennant Parade and Hello, Lovely.  Have you tried the Candy Dots yet?  Not the edible kind, but the new accessory from Stampin' Up.  Call me to order yours today!


Thanks for stopping by!
 

July 27, 2013

Undefined

I had promised I would tell you about a new product that was announced at convention.  Well, if you have been blog surfing you may already know about it.  The product is called "Undefined" and it is a kit to carve your very own stamps.  Stampin' Up had set up an area where we could carve a stamp using a sample of the Undefined kit.  It was a bit intimidating at first, trying to decide what to carve, and then not messing it up.  My first try is just okay.  I think with more practice the results would be better.  Check out my little stamp--just a crazy cat lady!


The arrow is from the Hello, Lovely stamp set which seems to go great with the I Am Me DSP.  Fun colors.  I covered the crooked eyes on the cat with rhinestones.  If you would like to try your hand at carving stamps feel free to contact me to order your "Undefined" kit!  Thanks for stopping by.
.

July 24, 2013

DSP Special and Convention 3-D Swap


There is only one week left of this great DSP special.  If you would like to take advantage of the special please call me, email me or order directly from my Demonstrator Website, www.stampingalamode.stampinup.net.   You don't want to miss out on a free pack of the lovely DSP Stampin' Up has to offer. 

Not really sure why I decided to make 3-D swaps for convention.  Back in June when I was working on graduation favors I noticed that the local party store had so many colorful treats.  Somewhere along the line I went back and purchased Coastal Cabana, Daffodil Delight and Pearl White gumballs.   Anyway, this is what I ended up putting together.  I ran out of white gumballs toward the end and substituted some Hershey nuggets.  In all, I think I made around 50 of the little treat bags.  I used up all of my Iridescent Ice embossing powder--good to the last drop!


Don't you just love the Chalk Talk stamp set?  The tag turned out so pretty and sparkly.  Thanks for stopping by!


July 22, 2013

Back from Convention

Convention just flew by!  It was my very first convention and because it was the 25th Anniversary of Stampin' Up, it was over the top.  There is really too much to share.  I worked like crazy on swaps in the days leading up to convention.  I made cards for two organized swaps and card fronts for general swapping.   These were my general swaps.  My Big Shot and punches really got a work out.


The next two cards were for the organized swaps.  The first was a New DSP swap. 
 
This second was for a WOW card swap.  I procrastinated on this one and had a hard time coming up with supplies for 20 cards.  I was still putting them together on my plane ride out to Salt Lake City!


I don't really know if it qualifies as a WOW card but it is a special type of card.  I thought the criss- cross card was fun and I paired it with the stained-glass technique.  Usually I stay away from embossing because it always sounds like a lot of work to me.  Last week I was an embossing fool!
 
Hope you enjoy looking at my convention creations.  I'll be back tomorrow to tell you about some exciting new additions to the Stampin' Up product line. 
 
Thanks for stopping by!